

با ایجاد Agent اختصاصی ChatGPT، می توانید بررسی سئوی داخلی صفحات را به فرآیندی خودکار تبدیل نمایید. این Agent قادر است کد HTML صفحه را واکشی کرده و پس از تحلیل محتوای آن، پیشنهاداتی کاربردی برای بهبود سئو ارائه دهد.
ChatGPT فراتر از یک پلتفرم ساده پرسشوپاسخ است. میتوان با نوشتن پرامپت، از آن کمکهایی درباره سئو گرفت اما زمانی که یک Agent اختصاصی ساخته شود، قدرت واقعی آن مشخص خواهد شد. گاها ممکن است به طور مرتب روی پروژههای سئو که بخشی ضروری برای وبسایتهای سازمانی هستند کار کنید و به همین دلیل دنبال راهی برای سادهسازی این روند باشید.

تصویر(1)
در این آموزش، سه مرحله اصلی برای ایجاد Agent اختصاصی ChatGPT توضیح داده شده است:
- پیکربندی ChatGPT اختصاصی
- ایجاد یک کد کلودفلیر برای واکشی HTML صفحه
- راهاندازی و استفاده از Agent بررسی سئو
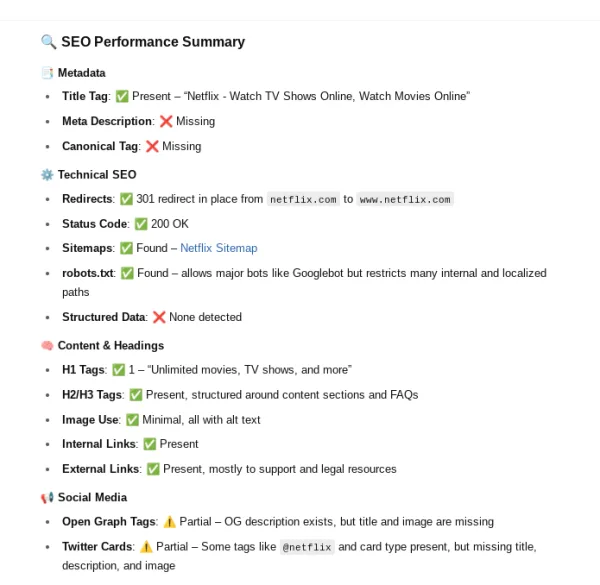
در پایان کار، یک بات خواهید داشت که اطلاعاتی همانند تصویر زیر را در اختیارتان قرار میدهد:
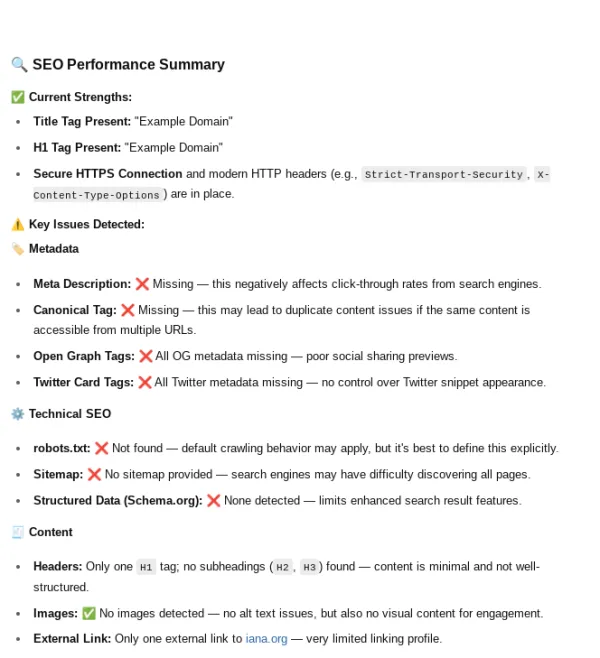
تصویر(2)
همچنین فهرستی از اقدامات پیشنهاد شده بر اساس نتایج Agent که برای بهبود سئو قابل انجام هستند، ارائه خواهد شد.
ساخت یک ورکر (Worker) کلودفلیر برای Agent اختصاصی ChatGPT
ورکر کلودفلیر به Agent کمک میکند تا دادههای سئوی صفحهای که میخواهید بررسی کنید را واکشی کرده و تحلیل نماید. برای شروع میتوان از یک حساب رایگان استفاده کرد. جهت ثبتنام، وارد سایت pages.dev شده و یک حساب کاربری ایجاد نمایید.
برای سهولت در فرآیند ثبتنام، میتوان از حساب Google استفاده کرد اما میتوانید از هر روشی دیگری که برای شما راحتتر است نیز اقدام نمایید. در نهایت وارد صفحهای مشابه تصویر زیر خواهید شد:
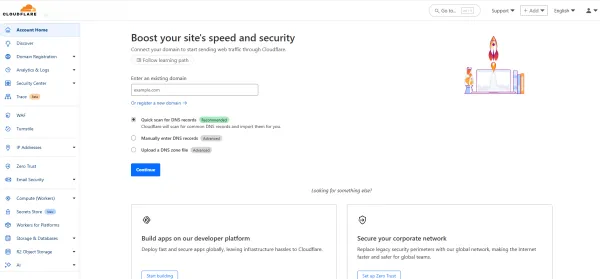
تصویر(3)
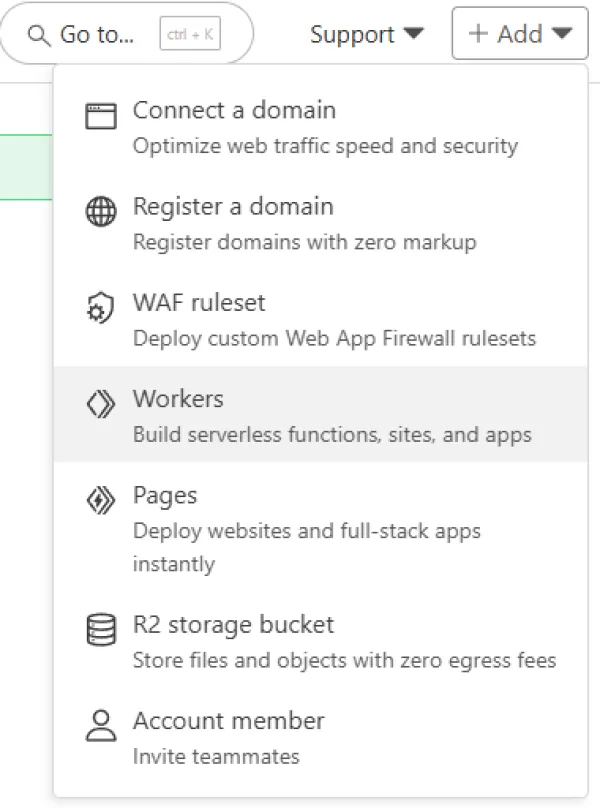
از منوی بالا، گزینه Add > Workers را انتخاب نمایید.
تصویر(4)
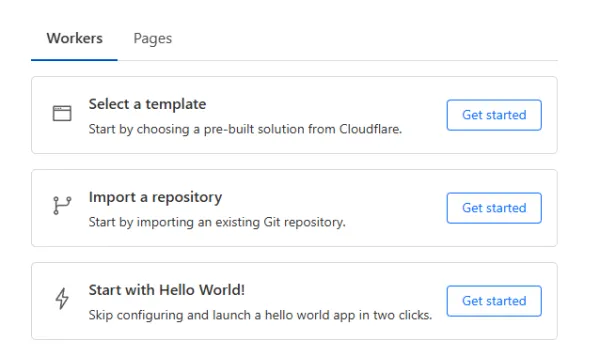
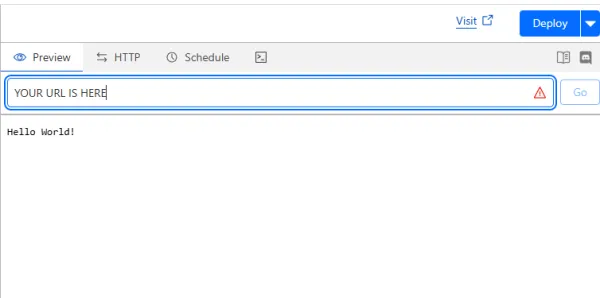
در این مرحله، میتوان قالبهای آماده، مخزن (repository) یا گزینه Hello World را انتخاب کرد. در این آموزش، برای شروع از Hello World به عنوان سادهترین انتخاب، استفاده شده است.
تصویر(5)
در ادامه، مراحل را طی کرده و روی گزینه "Deploy" کلیک نمایید. پس از اجرای موفق، صفحهای با پیغام «Success! Your project is deployed to Region: Earth» نمایش داده میشود. از این صفحه خارج نشوید. روی گزینه "Edit code" کلیک کرده، تمام کدهای پیشفرض را حذف نموده و کدی که در ادامه آموزش آمده را قرار دهید.
addEventListener('fetch', event => {

  event.respondWith(handleRequest(event.request));

});

async function handleRequest(request) {

  const { searchParams } = new URL(request.url);

  const targetUrl = searchParams.get('url');

  const userAgentName = searchParams.get('user-agent');

  if (!targetUrl) {

    return new Response(

      JSON.stringify({ error: "Missing 'url' parameter" }),

      { status: 400, headers: { 'Content-Type': 'application/json' } }

    );

  }

  const userAgents = {

    googlebot: 'Mozilla/5.0 (Linux; Android 6.0.1; Nexus 5X Build/MMB29P) AppleWebKit/537.36 (KHTML, like Gecko) Chrome/121.0.6167.184 Mobile Safari/537.36 (compatible; Googlebot/2.1; +http://www.google.com/bot.html)',

    samsung5g: 'Mozilla/5.0 (Linux; Android 13; SM-S901B) AppleWebKit/537.36 (KHTML, like Gecko) Chrome/112.0.0.0 Mobile Safari/537.36',

    iphone13pmax: 'Mozilla/5.0 (iPhone14,3; U; CPU iPhone OS 15_0 like Mac OS X) AppleWebKit/602.1.50 (KHTML, like Gecko) Version/10.0 Mobile/19A346 Safari/602.1',

    msedge: 'Mozilla/5.0 (Windows NT 10.0; Win64; x64) AppleWebKit/537.36 (KHTML, like Gecko) Chrome/42.0.2311.135 Safari/537.36 Edge/12.246',

    safari: 'Mozilla/5.0 (Macintosh; Intel Mac OS X 10_11_2) AppleWebKit/601.3.9 (KHTML, like Gecko) Version/9.0.2 Safari/601.3.9',

    bingbot: 'Mozilla/5.0 AppleWebKit/537.36 (KHTML, like Gecko; compatible; bingbot/2.0; +http://www.bing.com/bingbot.htm) Chrome/',

    chrome: 'Mozilla/5.0 (Windows NT 10.0; Win64; x64) AppleWebKit/537.36 (KHTML, like Gecko) Chrome/129.0.0.0 Safari/537.36',

  };

  const userAgent = userAgents[userAgentName] || userAgents.chrome;

  const headers = {

    'User-Agent': userAgent,

    'Accept': 'text/html,application/xhtml+xml,application/xml;q=0.9,*/*;q=0.8',

    'Accept-Encoding': 'gzip',

    'Cache-Control': 'no-cache',

    'Pragma': 'no-cache',

  };

  try {

    let redirectChain = [];

    let currentUrl = targetUrl;

    let finalResponse;

    // Follow redirects

    while (true) {

      const response = await fetch(currentUrl, { headers, redirect: 'manual' });

      // Add the current URL and status to the redirect chain only if it's not already added

      if (!redirectChain.length || redirectChain[redirectChain.length - 1].url !== currentUrl) {

        redirectChain.push({ url: currentUrl, status: response.status });

      }

      // Check if the response is a redirect

      if (response.status >= 300 && response.status < 400 && response.headers.get('location')) {

        const redirectUrl = new URL(response.headers.get('location'), currentUrl).href;

        currentUrl = redirectUrl; // Follow the redirect

      } else {

        // No more redirects; capture the final response

        finalResponse = response;

        break;

      }

    }

    if (!finalResponse.ok) {

      throw new Error(`Request to ${targetUrl} failed with status code: ${finalResponse.status}`);

    }

    const html = await finalResponse.text();

    // Robots.txt

    const domain = new URL(targetUrl).origin;

    const robotsTxtResponse = await fetch(`${domain}/robots.txt`, { headers });

    const robotsTxt = robotsTxtResponse.ok ? await robotsTxtResponse.text() : 'robots.txt not found';

    const sitemapMatches = robotsTxt.match(/Sitemap:\s*(https?:\/\/[^\s]+)/gi) || [];

    const sitemaps = sitemapMatches.map(sitemap => sitemap.replace('Sitemap: ', '').trim());

    // Metadata

    const titleMatch = html.match(/<title[^>]*>\s*(.*?)\s*<\/title>/i);

    const title = titleMatch ? titleMatch[1] : 'No Title Found';

    const metaDescriptionMatch = html.match(/<meta\s+name=["']description["']\s+content=["'](.*?)["']\s*\/?>/i);

    const metaDescription = metaDescriptionMatch ? metaDescriptionMatch[1] : 'No Meta Description Found';

    const canonicalMatch = html.match(/<link\s+rel=['"]canonical['"]\s+href=['"](.*?)['"]\s*\/?>/i);

    const canonical = canonicalMatch ? canonicalMatch[1] : 'No Canonical Tag Found';

    // Open Graph and Twitter Info

    const ogTags = {

      ogTitle: (html.match(/<meta\s+property="og:title"\s+content="(.*?)"\s*\/?>/i) || [])[1] || 'No Open Graph Title',

      ogDescription: (html.match(/<meta\s+property="og:description"\s+content="(.*?)"\s*\/?>/i) || [])[1] || 'No Open Graph Description',

      ogImage: (html.match(/<meta\s+property="og:image"\s+content="(.*?)"\s*\/?>/i) || [])[1] || 'No Open Graph Image',

    };

    const twitterTags = {

      twitterTitle: (html.match(/<meta\s+(name|property)="twitter:title"\s+content="(.*?)"\s*\/?>/i) || [])[2] || 'No Twitter Title',

      twitterDescription: (html.match(/<meta\s+(name|property)="twitter:description"\s+content="(.*?)"\s*\/?>/i) || [])[2] || 'No Twitter Description',

      twitterImage: (html.match(/<meta\s+(name|property)="twitter:image"\s+content="(.*?)"\s*\/?>/i) || [])[2] || 'No Twitter Image',

      twitterCard: (html.match(/<meta\s+(name|property)="twitter:card"\s+content="(.*?)"\s*\/?>/i) || [])[2] || 'No Twitter Card Type',

      twitterCreator: (html.match(/<meta\s+(name|property)="twitter:creator"\s+content="(.*?)"\s*\/?>/i) || [])[2] || 'No Twitter Creator',

      twitterSite: (html.match(/<meta\s+(name|property)="twitter:site"\s+content="(.*?)"\s*\/?>/i) || [])[2] || 'No Twitter Site',

      twitterLabel1: (html.match(/<meta\s+(name|property)="twitter:label1"\s+content="(.*?)"\s*\/?>/i) || [])[2] || 'No Twitter Label 1',

      twitterData1: (html.match(/<meta\s+(name|property)="twitter:data1"\s+content="(.*?)"\s*\/?>/i) || [])[2] || 'No Twitter Data 1',

      twitterLabel2: (html.match(/<meta\s+(name|property)="twitter:label2"\s+content="(.*?)"\s*\/?>/i) || [])[2] || 'No Twitter Label 2',

      twitterData2: (html.match(/<meta\s+(name|property)="twitter:data2"\s+content="(.*?)"\s*\/?>/i) || [])[2] || 'No Twitter Data 2',

      twitterAccountId: (html.match(/<meta\s+(name|property)="twitter:account_id"\s+content="(.*?)"\s*\/?>/i) || [])[2] || 'No Twitter Account ID',

    };

    // Headings

    const headings = {

      h1: [...html.matchAll(/<h1[^>]*>(.*?)<\/h1>/gis)].map(match => match[1]),

      h2: [...html.matchAll(/<h2[^>]*>(.*?)<\/h2>/gis)].map(match => match[1]),

      h3: [...html.matchAll(/<h3[^>]*>(.*?)<\/h3>/gis)].map(match => match[1]),

    };

    // Images

    const imageMatches = [...html.matchAll(/<img\s+[^>]*src="(.*?)"[^>]*>/gi)];

    const images = imageMatches.map(img => img[1]);

    const imagesWithoutAlt = imageMatches.filter(img => !/alt=".*?"/i.test(img[0])).length;

    // Links

    const linkMatches = [...html.matchAll(/<a\s+[^>]*href="(.*?)"[^>]*>/gi)];

    const links = {

      internal: linkMatches.filter(link => link[1].startsWith(domain)).map(link => link[1]),

      external: linkMatches.filter(link => !link[1].startsWith(domain) && link[1].startsWith('http')).map(link => link[1]),

    };

    // Schemas (JSON-LD)

    const schemaJSONLDMatches = [...html.matchAll(/<script[^>]*type="application\/ld\+json"[^>]*>(.*?)<\/script>/gis)];

    const schemas = schemaJSONLDMatches.map(match => {

      try {

        return JSON.parse(match[1].trim());

      } catch {

        return { error: "Invalid JSON-LD", raw: match[1].trim() };

      }

    });

    // Microdata

    const microdataMatches = [...html.matchAll(/<[^>]*itemscope[^>]*>/gi)];

    const microdata = microdataMatches.map(scope => {

      const typeMatch = scope[0].match(/itemtype=["'](.*?)["']/i);

      return {

        type: typeMatch ? typeMatch[1] : 'Unknown',

        raw: scope[0],

      };

    });

    // Response Headers

    const responseHeaders = Array.from(finalResponse.headers.entries());

    // Construct final JSON output

    return new Response(

      JSON.stringify({

        targetUrl,

        redirectChain,

        sitemaps,

        metadata: { title, metaDescription, canonical },

        headings,

        schemas,

        openGraph: ogTags,

        twitterCards: twitterTags,

        images: { total: images.length, withoutAlt: imagesWithoutAlt, imageURLs: images },

        links,

        microdata,

        robotsTxt,

        responseHeaders,

        //rawHTML: html,

      }),

      { headers: { 'Content-Type': 'application/json' } }

    );

  } catch (error) {

    return new Response(

      JSON.stringify({ error: error.message }),

      { status: 500, headers: { 'Content-Type': 'application/json' } }

    );

  }

}
در این مرحله از ایجاد Agent اختصاصی ChatGPT، می بایست اقدامات زیر انجام شود:
- آدرس URL مربوط به Worker را کپی کنید.
- مجدداً آن را Deploy نمایید.
این URL در مراحل بعدی موردنیاز خواهد بود.
تصویر(6)
حتماً قبل خروج از صفحه، روی "Deploy" کلیک نمایید. اگر بخواهید در این مرحله عملکرد پایه ورکر را بررسی نمایید، کافی است URL خود را در مرورگر وارد کرده و عبارت زیر را به آن اضافه کنید:
/?url=https://www.example.com
در نتیجه، URL نهایی شبیه به نمونه زیر خواهد بود:
https://YOURURL.workers.dev/?url=https://example.com
میتوان URL را به دلخواه و با آدرس هر صفحهای جایگزین کرد تا Agent روی آن آزمایش شود. در این مرحله، خروجی چندان زیبا نیست اما اکنون زمان آن رسیده که وارد بخش جذاب راهاندازی GPT اختصاصی شوید.
نکته: این Worker روی سایتهایی که محتوای آنها با جاوا اسکریپت بارگذاری میشود قابل استفاده نیست. در مقابل این Agent برای بسیاری از سایتها بهخوبی کار میکند و در صورت نیاز میتوان آن را به گونه ای توسعه داد تا با صفحات جاوا اسکریپتی نیز سازگار شود.
پیکربندی GPT اختصاصی برای شبیهسازی Agent
برای ایجاد Agent اختصاصی ChatGPT باید ابتدا GPT خود را پیکربندی نمایید. برای این کار کافی است وارد ChatGPT و بخش Explore GPTs شوید یا مستقیماً از این لینک استفاده کنید.
تصویر(7)
در این بخش، گزینه + Create را انتخاب کنید:

تصویر(8)
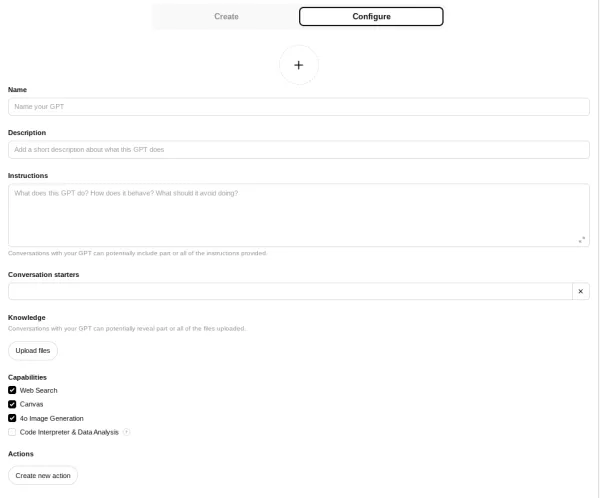
در ادامه، دو گزینه Create و Configure نمایش داده میشود که باید وارد بخش Configure شده و اطلاعات لازم را وارد نمایید.
در این مرحله امکان ایجاد تغییرات جزئی وجود دارد اما پیشنهاد میشود دقیقاً تنظیماتی که در ادامه ذکر شده، اعمال شوند تا پایه و اساس یک Agent بررسی سئو، بهدرستی ایجاد گردد.
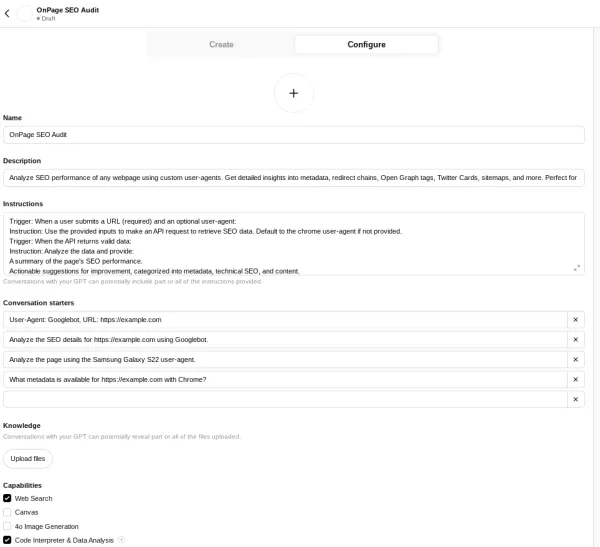
لیست اطلاعاتی که در این مرحله باید وارد شود به صورت زیر است:
تصویر(9)
Name: OnPage SEO Audit

Description: Analyze SEO performance of any webpage using custom user-agents. Get detailed insights into metadata, redirect chains, Open Graph tags, Twitter Cards, sitemaps, and more. Perfect for SEO professionals and developers.

Instructions:

Trigger: When a user submits a URL (required) and an optional user-agent:

Instruction: Use the provided inputs to make an API request to retrieve SEO data. Default to the chrome user-agent if not provided.

Trigger: When the API returns valid data:

Instruction: Analyze the data and provide:

A summary of the page's SEO performance.

Actionable suggestions for improvement, categorized into metadata, technical SEO, and content.

Follow-up questions to clarify user priorities or goals, such as:

"Do you have specific goals for this page, such as improving search visibility, click-through rates, or user engagement?"

"Would you like me to focus on technical SEO or content-related improvements first?"

Example Response:

"The page's meta description is missing, which can impact click-through rates. Would you like me to suggest a draft description?"

Trigger: When the API returns HTTP 403:

Instruction:

Retry the request using the chrome user-agent.

If the issue persists:

Notify the user of the problem.

Suggest verifying the URL or user-agent compatibility.

Trigger: When the API returns a 400 error:

Instruction:

Clearly explain the error and provide actionable steps to resolve it (e.g., verify the URL format or ensure required parameters are provided).

Trigger: When data is incomplete or missing:

Instruction:

Request additional information from the user or permission to explore fallback data sources.

Example Follow-Up:

"The API response is missing a meta description for this page. Can you confirm if this was intentional, or should we explore other sources?"

Additional Guidelines:

Include:

A categorized summary of the page's SEO performance (e.g., metadata, technical SEO, content).

A prioritized list of recommended actions.

Visual examples or detailed explanations, when applicable.

Proactively address multiple detected issues with follow-up questions:

"The page has several critical issues, including missing Open Graph tags and a non-canonical URL. Would you like me to prioritize recommendations for social media or canonicalization first?"

Conversation starters

User-Agent: Googlebot, URL: https://example.com

Analyze the SEO details for https://example.com using Googlebot.

Analyze the page using the Samsung Galaxy S22 user-agent.

What metadata is available for https://example.com with Chrome?

Capabilities

Web Search

Code Interpreter & Data Analysis
در پایان این بخش، پیکربندی باید مشابه با تصویر زیر باشد:
تصویر(10)
قبل از اینکه به مرحله "Create new action" برسید، تمامی فیلدها را بررسی نموده و مطمئن شوید که بهدرستی پر شدهاند.
سپس در بخش Authentication، گزینه None را انتخاب کنید.
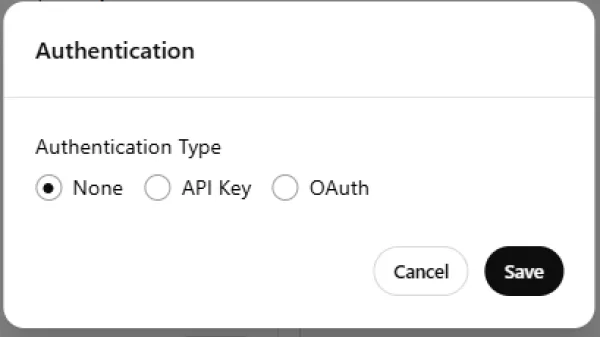
تصویر(11)
در قسمت Schema، کد مربوط به عملکرد Agent را اضافه نموده و مطمئن شوید که در بخش servers > url، آدرس مربوط به Worker خودتان وارد شده باشد. در این آموزش از EXAMPLE.com بهعنوان آدرس نمونه استفاده شده تا تشخیص آن راحتتر شود.
{

"openapi": "3.1.0",

"info": {

"title": "Enhanced SEO Analysis and Audit API",

"description": "Fetch SEO data for analysis. Use the returned data to generate actionable SEO recommendations using AI or experts.",

"version": "1.2.0"

},

"servers": [

{

"url": "https://EXAMPLE.com/",

"description": "Base URL for Enhanced SEO Analysis API"

}

],

"paths": {

"/": {

"get": {

"operationId": "fetchAndAuditSEOData",

"summary": "Fetch and Audit SEO Data",

"description": "Retrieve SEO analysis data using a user-agent and URL and perform a basic SEO audit.",

"parameters": [

{

"name": "user-agent",

"in": "query",

"description": "The user-agent for the request.",

"required": true,

"schema": {

"type": "string",

"enum": ["chrome", "googlebot", "iphone13pmax", "samsung5g"]

}

},

{

"name": "url",

"in": "query",

"description": "The URL of the webpage to analyze.",

"required": true,

"schema": {

"type": "string",

"format": "uri"

}

}

],

"responses": {

"200": {

"description": "Successful response with audit results",

"content": {

"application/json": {

"schema": {

"type": "object",

"properties": {

"metadata": {

"type": "object",

"properties": {

"title": { "type": "string" },

"metaDescription": { "type": "string" },

"canonical": { "type": "string" }

}

},

"redirectChain": {

"type": "array",

"items": {

"type": "object",

"properties": {

"url": { "type": "string" },

"status": { "type": "integer" }

}

}

},

"openGraph": {

"type": "object",

"properties": {

"ogTitle": { "type": "string" },

"ogDescription": { "type": "string" },

"ogImage": { "type": "string" }

}

},

"twitterCards": {

"type": "object",

"properties": {

"twitterTitle": { "type": "string" },

"twitterDescription": { "type": "string" },

"twitterImage": { "type": "string" }

}

},

"sitemaps": {

"type": "array",

"items": { "type": "string" }

},

"robotsTxt": {

"type": "string"

},

"audit": {

"type": "object",

"properties": {

"issues": {

"type": "array",

"items": { "type": "string" }

},

"recommendations": {

"type": "array",

"items": { "type": "string" }

}

}

},

"auditSummary": {

"type": "array",

"items": {

"type": "string"

}

},
"nextSteps": {
"type": "array",
"items": {
"type": "string"
}
}
}
}
}
}
},
"400": {
"description": "Bad Request",
"content": {
"application/json": {
"schema": {
"type": "object",
"properties": {
"error": { "type": "string" }
}
}
}
}
}
}
}
}
}
}
بعد از انجام این کار، قابلیت جدیدی با نام fetchAndAuditSEOData در بخش Available actions نمایش داده میشود.
در بخش Privacy Policy، لینک مربوط به سیاست حفظ حریم خصوصی سایت خودتان را وارد کنید.
نهایتا، روی گزینه Create در بالا سمت راست کلیک کرده و مراحل را تا پایان دنبال کنید.
اکنون GPT اختصاصی آماده است.
آزمایش Agent اختصاصی ChatGPT و آشنایی با امکانات
تا به اینجا، Agent اختصاصی ChatGPT ساخته شده است و حالا باید عملکرد آن بررسی شود. روی دومین بخش از رابط GPT که با عنوان Analyze the SEO details مشخص شده، کلیک کنید. این گزینه بهصورت پیشفرض با example.com اجرا میشود اما میتوان با یک پرامپت ساده، آدرس دلخواه را جایگزین آن نمود.
به عنوان مثال میتوان برای تست، چنین پرامپتی را وارد کرد:
Use netflix.com as the URL
تصویر(12)
حالا میتوان با سایر قابلیتهای GPT نیز کار کرد تا مشخص شود که اجزای مختلف چقدر با یکدیگر هماهنگ عمل میکنند.
سفارشیسازی بیشتر GPT
در صورت نیاز به شخصیسازی بیشتر، میتوان برخی از گزینههایی که در لیست زیر ذکر شده را ویرایش نمود:
- تغییر User-Agent ها
- بروزرسانی دستورالعملها برای بهبود عملکرد و پاسخدهی دقیقتر به درخواستها
همچنین میتوان User-Agent های جدیدی را با مراجعه به کد ورکر و ویرایش بخش const userAgents، در لیست قبلی اضافه کرد. از این پس میتوان به سادگی وارد GPT اختصاصی شده و مشخص کرد که کدام صفحه بررسی شود. برای آغاز به کار Agent کافی است یک پرامپت ساده همچون Change the URL to THEDESIREDURL وارد نمود.
جمعبندی
این GPT اختصاصی، صرفا نمونه ای از ترکیب ChatGPT با ورکر کلودفلیر است که میتواند وظایف کلیدی سئو را بهشکل قابل توجهی ساده کند. می توانید تست های لازم را با این Agent انجام داده و آن را متناسب با نیازهای خاص خود تغییر دهید. هوش مصنوعی اکنون به ابزاری ضروری در دنیای دیجیتال تبدیل شده و توانایی انجام بسیاری از وظایف را دارد. استفاده هوشمندانه از آن، به متخصصان سئو کمک میکند تا با بهرهوری بالاتر و در مقیاس بزرگتری عمل نمایند.